
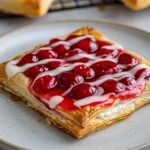
Cozy Cherry Danish Recipe: A Sweet Nostalgic Treat
There’s something undeniably heartwarming about the scent of freshly baked pastries wafting through the kitchen. It evokes memories of cozy Saturday mornings spent with family, savouring sweet bites as laughter echoed around the table. Today, I want to share with you one of my beloved recipes that captures that very essence: Cherry Danish! These tender pockets of flaky puff pastry filled with creamy goodness and topped with luscious cherry pie filling are a dream come true. The best part? They are incredibly easy to make! Perfect for a lazy weekend brunch or a delightful dessert, this easy cherry dessert is one you’ll definitely want to pin for later!
Why You’ll Love This Recipe
- Quick and Easy: With store-bought puff pastry, you can whip these up in no time!
- Crowd-Pleasing Treat: The perfect balance of sweet and creamy makes this dessert irresistible.
- Family-Friendly: Kids love helping out in the kitchen, and these mini pastries are fun to assemble!
- Versatile Flavor Options: Customize with different fillings or toppings to suit your craving.
- Baked to Perfection: Golden brown, crispy on the outside, and tender on the inside — a delightful texture!
What You’ll Need
To create these delightful Cherry Danishes, gather the following simple ingredients:
- 1 package store-bought puff pastry
- 8 oz cream cheese, softened
- 1/4 cup sugar
- 1 tsp vanilla extract
- 1 can cherry pie filling
- 1 egg (for egg wash)
- Flour (for dusting)
Let’s Make It Together
- Preheat the oven to 400°F (200°C).
- Roll out the puff pastry on a lightly floured surface until it’s smooth and thin.
- Cut the pastry into squares or rectangles, about 4 inches by 4 inches.
- In a bowl, mix the softened cream cheese, sugar, and vanilla extract until smooth and creamy. The blend should be rich and inviting!
- Place a spoonful of the cream cheese mixture in the center of each pastry square, letting it be the star of the show.
- Top the cream cheese with a generous dollop of cherry pie filling, placing it right in the center.
- Fold the corners of the pastry over the filling to create a lovely pocket, sealing in all the goodness.
- Brush the tops with a beaten egg to enhance the golden browning — this is where the magic happens!
- Bake for 15-20 minutes or until they turn a beautiful, golden brown.
- Let cool slightly before serving, and then enjoy your delectable Cherry Danish while basking in the cheerful aroma that fills your home!
Fun Ways to Customize It
- Berry Medley: Mix in some blueberries or strawberries with your cherry filling for a vibrant twist.
- Zesty Lemon Cream: Add a hint of lemon zest to the cream cheese mixture for a refreshing zing.
- Nutty Delight: Sprinkle slivered almonds or crushed pistachios on top for an indulgent crunch.
- Chocolate Drizzle: Drizzle melted chocolate over the cooled pastries for an extra touch of decadence.
Chef Emma’s Helpful Tips
- Make-Ahead Option: You can prepare the cream cheese filling in advance and store it in the refrigerator for up to 2 days.
- Freezing Instructions: If you want to make a batch ahead of time, bake them without the egg wash, freeze, and then bake straight from the freezer! Just add a few extra minutes to the baking time.
- Perfect Puff Pastry: Keep the puff pastry cold until you’re ready to roll it out. This helps it to puff up beautifully in the oven!
- Storage Suggestions: Store any leftovers in an airtight container in the fridge for up to three days — they’re almost as delightful chilled!
What’s Inside – Nutrition Breakdown
- Serving Size: 1 Danish
- Calories: 210
- Carbohydrates: 23g
- Sugar: 6g
- Fat: 12g
- Protein: 3g
- Sodium: 150mg
Frequently Asked Questions
Can I make this ahead?
Yes! Prepare the filling ahead of time and assemble when ready to bake.
Can I use different ingredients?
Absolutely! Swap the cherry filling for any fruit preserves or fresh fruit combinations.
How do I store leftovers?
Keep them in an airtight container in the fridge for up to three days.
How long does it last?
They are best enjoyed fresh, but you can store leftovers for a couple of days in the refrigerator!
Cozy Closing Note
In the comforting embrace of a well-baked Cherry Danish, you’ll find a delightful warmth that makes any day feel special. Whether it’s for brunch with loved ones or a sweet treat just for you, this recipe wraps you in nostalgia with each tender bite. I hope you’ll save this Cherry Danish to your dessert board so it’s ready when you’re in need of a cozy treat. Happy baking!
Cozy Cherry Danish
- Total Time: 35 minutes
- Yield: 4 servings 1x
- Diet: Vegetarian
Description
Tender pockets of flaky puff pastry filled with creamy goodness and topped with luscious cherry pie filling, perfect for brunch or dessert.
Ingredients
- 1 package store-bought puff pastry
- 8 oz cream cheese, softened
- 1/4 cup sugar
- 1 tsp vanilla extract
- 1 can cherry pie filling
- 1 egg (for egg wash)
- Flour (for dusting)
Instructions
- Preheat the oven to 400°F (200°C).
- Roll out the puff pastry on a lightly floured surface until it’s smooth and thin.
- Cut the pastry into squares or rectangles, about 4 inches by 4 inches.
- Mix the softened cream cheese, sugar, and vanilla extract in a bowl until smooth and creamy.
- Place a spoonful of the cream cheese mixture in the center of each pastry square.
- Top the cream cheese with a generous dollop of cherry pie filling.
- Fold the corners of the pastry over the filling to create a pocket.
- Brush the tops with a beaten egg.
- Bake for 15-20 minutes or until golden brown.
- Let cool slightly before serving.
Notes
Make-ahead option available; fill and store for up to 2 days. Can be frozen before baking.
- Prep Time: 15 minutes
- Cook Time: 20 minutes
- Category: Dessert
- Method: Baking
- Cuisine: American
Nutrition
- Serving Size: 1 Danish
- Calories: 210
- Sugar: 6g
- Sodium: 150mg
- Fat: 12g
- Saturated Fat: 6g
- Unsaturated Fat: 6g
- Trans Fat: 0g
- Carbohydrates: 23g
- Fiber: 1g
- Protein: 3g
- Cholesterol: 55mg